Please visit ebmdesigns.com

Sunday, May 26, 2013
Monday, April 29, 2013
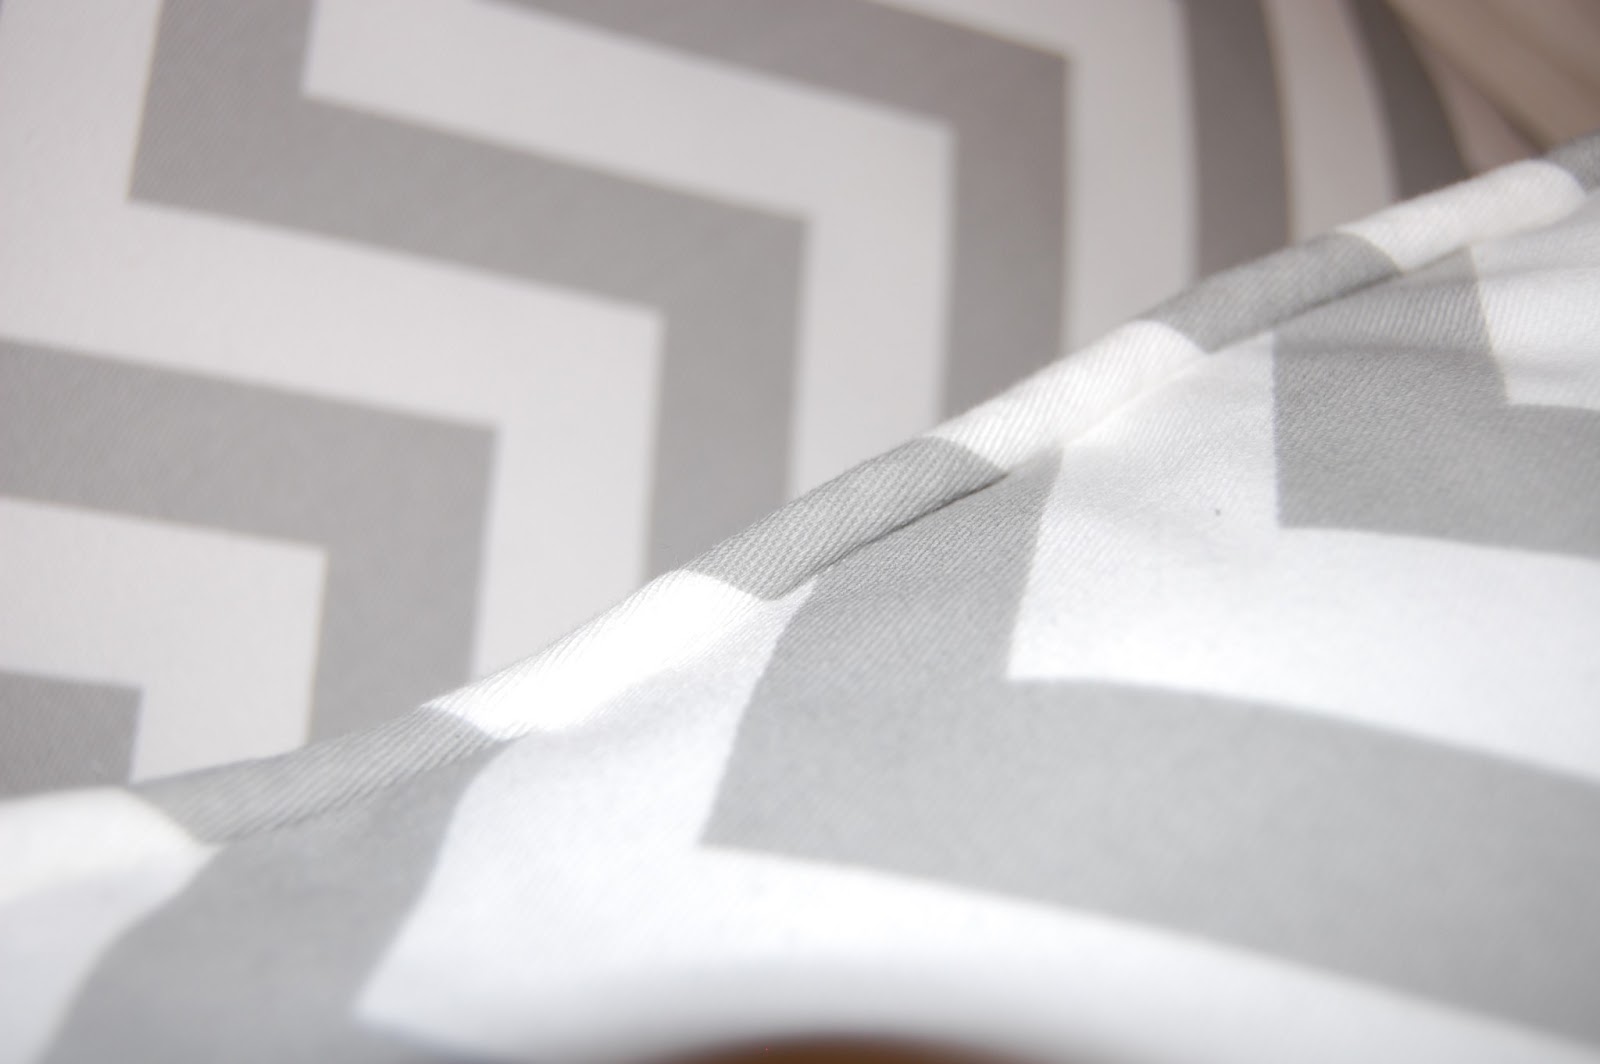
Chevron Pillow Project
I decided it was time to step up my DIY game and buy a sewing machine! I took a couple sewing classes in high school and my Mom sewed occasionally when I was a kid, but other than that this is very new to me.
Since chevron is so in right now, I couldn't help but make some pillows as my first real sewing machine project.
Materials:
Chevron fabric - $12
Pillow inserts - $18 (with a coupon, of course!)
Cord - $3 (purchased at work)
I started by cutting the fabric panels. Since the pillow inserts are 20x20, I cut 4 fabric panels sized 21x21. This left an extra 1/2" on each side to secure the piping.
Then it was time to sew the piping. I cut a strip of fabric long enough to go all the way around the 20x20 pillow. I changed the foot on the sewing machine to the zipper foot. Apparently it's not made exactly for this task, but it came with the sewing machine so I made it work.


Once the piping was complete, I cut the extra fabric to 1/2" outside the cord. I did this to match the extra 1/2" I left on the fabric panels. I lined the side of the piping up with the edge of the fabric and sewed away. I used a disappearing ink pen to draw the round corner, and sewed carefully. This was definitely the most difficult part of the sewing.
Once the piping was secured to one side of the fabric, I placed the other fabric panel on top and sewed along edge as closely as possible.
Because I'm not an expert and haven't tried zippers yet, I decided to leave a portion of the pillow open and hand sew the rest.


I left one of the corners to hand sew, but if I could do it over I would sew all of the corners on the machine and just leave a straight line to hand sew. A little love and a lot of frustration, but all in all I'm very happy with my new $30 pillows!


Wednesday, April 17, 2013
Propagating Succulent Plants
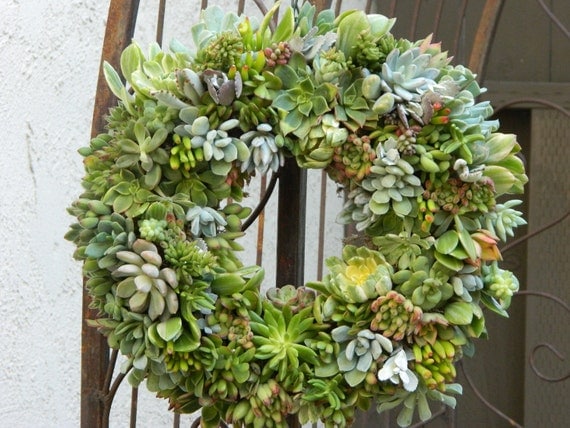
I purchased 2 succulents at the nursery and am planning on turning them in to many more. After reading about this process online, I decided on my course of action.
1. Remove the leaves toward the bottom of the plant. Then remove the top portion of the plant.
2. Let the leaves and top part of the original plant sit for a few days so the part where the plant was detached can dry out and callus over.
3. Lay the leaves on soil and plant the larger portion of the plant.

4. Some people recommend watering these everyday, while some people recommend not watering until they grow roots. I'm going to do half and half, and see which one works more quickly.
5. I also planted the original succulent plants and am hoping they will reproduce where the leaves where taken off. (see below)


6. Will update on which method works best and how long this process takes!
Monday, April 8, 2013
Jewelry Frame Update
After living with my new jewelry wall and absolutely loving it, I realized it was missing one component... bracelets.
Solution: project!
Supplies:
1 1/4" x 36" dowel, cut to length
Single bright brass clothes hooks
#6 x 1 1/2" brass wood screws
Hand saw
Sandpaper
White matte Rustoleum spray paint
5/8" x 2 1/2" oak square bullseye blocks


I chose the oak square rosette blocks because they were the perfect size to mount the hooks onto without having to do any measuring or cutting. I sanded the blocks and spray painted them with 2 coats of matte white paint, the same color I used on the original frame. (note: the rosette blocks are necessary to leave enough space between the dowel and the wall for the bracelets to hang freely)
While they were drying, I used my hand saw to cut the dowel to size. I measured the width of my frame, and used that as my measurement. Then I sanded and painted this the same color.
Once the blocks were dry, I decided on placement for the hooks and predrilled holes through the oak blocks. I usually hate to predrill, but I decided that it wouldn't be worth having the blocks split after the time spent sanding and painting!

Once the holes were predrilled, I lined up my block to the outside of the frame and used the 1 1/2" brass screws to attach the hooks through the oak blocks and into the wall. (note: I did not use the screws that came with the hooks, as they were not long enough)


Once the hooks were up, I decorated the dowel with my bracelets and bangles and gave them their very own home.

Solution: project!
Supplies:
1 1/4" x 36" dowel, cut to length
Single bright brass clothes hooks
#6 x 1 1/2" brass wood screws
Hand saw
Sandpaper
White matte Rustoleum spray paint
5/8" x 2 1/2" oak square bullseye blocks


While they were drying, I used my hand saw to cut the dowel to size. I measured the width of my frame, and used that as my measurement. Then I sanded and painted this the same color.
Once the blocks were dry, I decided on placement for the hooks and predrilled holes through the oak blocks. I usually hate to predrill, but I decided that it wouldn't be worth having the blocks split after the time spent sanding and painting!


Once the hooks were up, I decorated the dowel with my bracelets and bangles and gave them their very own home.

Wednesday, March 27, 2013
Fun with Rosemary
San Francisco has had unbelievable weather this spring. I usually don't get obsessed with gardening until much later in the summer, but because of the beautiful weekends we've been having, I've already started planting and preparing for summer.

We do a lot of BBQing when the weather is nice, and my small little rosemary plant is almost gone from all the pork marinades we've been making. So, I decided to learn how to propagate a rosemary bush to get the herb garden ready for a lot of summer bbqs.

I took the trimmings from a neighbors herb plant that had plenty to spare. I decided on 6 sprigs in hoping that at least 4 take root. I peeled the leaves off the bottom half of each cutting so that only the stem was exposed. I then put them in water in matching mason jars, so they at least look nice while hanging out in my bathroom for a few weeks.
Will write another post to keep you updated on whether or not this works.


Now, I have a lot of rosemary and nothing to do with it!
Time for a little Martha Stewart.


I peeled off the leaves and washed them thoroughly. Diced them a tad and mixed with olive oil. Then I poured the mixture into this adorable silicone ice tray. I often use garlic and rosemary together so I diced some garlic and added that to half of the tray as well. Then I filled the tray with olive oil until they were all even. I mixed each individual cube so that the rosemary and garlic were spread out before freezing, although this step isn't necessary. Put in the freezer overnight and voila! Rosemary and olive oil ready for cooking anytime.


Tuesday, March 19, 2013

This one includes:
5/8 X 1 5/8 solid pine moulding
3/4" square dowel
Miter box/saw
Brad nails
Hammer
Wood glue
Clamps
Sandpaper
Wood filler/putty knife
Matte white Rustoleum spray paint
1/4" 24 gauge hardware cloth
Gold Rustoleum spray paint
Staple gun/staples
3/4" S hooks
First thing I did was measure the size of the space I wanted to hang this in. Then I cut the dowels to size to create a rectangular frame for the moulding to attach to. I sanded the edges a bit and used a small brad nail and wood glue to secure them together. Attaching the pine moulding to this frame leaves space between the moulding and the wall so you can hang your jewels more easily, and also gives you a place to attach the hardware cloth so the frame can sit flush to the wall, as you can see in the photos below.


Once the dowel frame was built, I cut 45 degree angles on the corners of the pine moulding, making sure the outside edges were the same as the length of the rectangular frame I just built. Remember, measure twice, cut once! Lightly sand the edges after cutting.
Then I put wood glue on the dowel frame and bottom side of the moulding pieces and used clamps to secure them together. Make sure the corners of the moulding don't have any space between them. Leave at least 24 hours for the glue to dry completely before removing the clamps. After removing the clamps, I put small brad nails into the moulding and through the square dowel for extra strength. I only put them in the corners, because each one you do will need to be filled and sanded before you can paint the frame.
The next step is to fill and sand the entire frame. Take the wood filler and fill in any of the nail holes you created. I also had minor spaces where the 45 degree angles came together on one side, so I filled it in with wood filler so it wouldn't be noticeable when painted. After the wood filler has dried, sand the entire frame thoroughly, and wipe it off with a moist towel to get it ready for painting.
Paint the frame using the matte white spray paint. I did 2 heavy coats that seemed to cover it well. Don't forget to sand lightly in between.

Once the frame is complete it's time for the hardware cloth. It comes in a silver color, but I wanted mine to be gold, so I cut the hardware cloth to size, and then spray painted it thoroughly on both sides.
After it is dry, use a staple gun to attach it to the back side of the moulding. Voila!
I then realized that I hadn't figured out how I was going to secure it to the wall. Oops! I ended up using the extra pieces of dowel I had from making the frame. I attached them securely to the wall using wood screws. Then I attached the frame to the dowels on the wall from above and below using the same wood screws. As you can see from this photo, I should have pre drilled the holes to avoid the cracking of the wood. This isn't the prettiest solution, but I never see it because the height of the frame is about a foot taller than I am!

The last piece to this puzzle are the S hooks that the jewels will hang on. They also came in silver so I spray painted them gold. I found that doing multiple light coats worked better for these.
The best part of this whole process is decorating the frame with your jewels! It really turns into a piece of art.
Enjoy!
Friday, March 1, 2013
Personalized SF Art Piece
One lovely evening I was window shopping on Union St. and came across this painting that I absolutely had to have. Come to find out it was $400. Since that is WAY out of my budget, I decided I could make one myself, AND customize it to all the places that I love in the city.

The original appeared to be painted on a wood board and had a very rustic/vintage vibe. I decided I could best duplicate this by using a canvas and acrylic paint.

I started by painting the entire canvas a light grey color. It will end up being the color of the words in the painting. After letting that dry completely, I painted on a coat of acrylic crackle (which can be purchased at any art store).
Once the crackle was completely dry, I went to town positioning the words. This was really the hardest part of the whole process! I have a cricket cutting machine and I used half sheet sticky mailing labels to cut the letters out. I ended up testing the whole thing with plain paper to get the sizing right before cutting out the stickers. I used a font that felt contemporary, but if you change the font you can make a masterpiece for any design aesthetic.
Once the stickers were placed, I painted the dark grey color over then entire piece and watched the crackle work it's magic as the painting dried. Once the whole thing was dry, I peeled off the stickers. Because the stickers I used were paper based, they were a total pain to get off! I would recommend using stickers with plastic or another material that won't absorb water from the paint.

Once completed, I have a piece of art that is personal to me, and all for only $50!
Subscribe to:
Comments (Atom)